March 2020 - Just for Fun
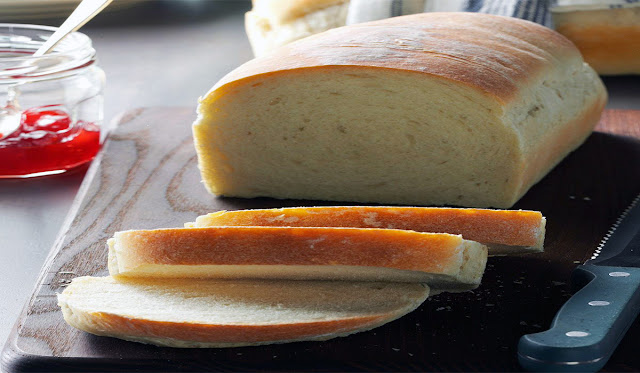
Basic Homemade Bread | Easy & Fun Recipes

Basic Homemade Bread | Easy & Fun Recipes

Homemade Bread is one of my favorite foods of all time. Can you tell by the name of this site?! There really is nothing quite like a warm slice of fresh bread served with a thick pat of butter on top. Mmmmm! This recipe is perfect. It’s simple to follow, takes about 2 hours to make and yields 2 loaves of wonderful bread.

It’s quite versatile too, so feel free to use part whole wheat flour if you’d like. So this recipe has lots of experience in my kitchen and I hope that you find it easy to make as well. It really is the easiest most perfect yeast bread recipe I’ve come across yet!

Ingredients

  • 1 package (1/4 ounce) active dry yeast
  • 2-1/4 cups warm water (110° to 115°)
  • 3 tablespoons sugar plus 1/2 teaspoon sugar
  • 1 tablespoon salt
  • 2 tablespoons canola oil
  • 6-1/4 to 6-3/4 cups bread flour

Directions

  1. In a large bowl, dissolve yeast and 1/2 teaspoon sugar in warm water; let stand until bubbles form on surface. Whisk together remaining 3 tablespoons sugar, salt, and 3 cups flour. Stir oil into yeast mixture; pour into flour mixture and beat until smooth. Stir in enough remaining flour, 1/2 cup at a time, to form a soft dough.
  2. Turn onto a floured surface; knead until smooth and elastic, 8-10 minutes. Place in a greased bowl, turning once to grease the top. Cover and let rise in a warm place until doubled, 1-1/2 to 2 hours.
  3. Punch dough down. Turn onto a lightly floured surface; divide dough in half. Shape each into a loaf. Place in 2 greased 9x5-in. loaf pans. Cover and let rise until doubled, 1 to 1-1/2 hours.
  4. Bake at 375° until golden brown and bread sounds hollow when tapped or has reached an internal temperature of 200°, 30-35 minutes. Remove from pans to wire racks to cool.
Nutrition Facts
1 slice: 102 calories, 1g fat (0 saturated fat), 0 cholesterol, 222mg sodium, 20g carbohydrate (1g sugars, 1g fiber), 3g protein.

How to Store Homemade Bread?


You can store homemade bread in a plastic bag or a bread box for maximum freshness. If you don't think you can finish it in a few days' time, you can also freeze bread. Just wrap it up in plastic and pop in the freezer. It'll keep for a few months. If your bread has gone a bit stale, you can always use it to make homemade croutons, French toast or bread pudding.

I truly feel that’s what I love most about bread. It gives you such a satisfaction of knowing you created this thing of which you are about to partake among friends that will fuel your body and fill your soul. It’s just like the wonderful mercy of our Savior. The pure joy of your soul being filled by the Maker himself.
Homemade Cornbread | Easy and Fun Recipes

Homemade Cornbread | Easy and Fun Recipes

This easy cornbread recipe is sweet, moist and super delicious! Its crunchy, buttery edges make this the best cornbread recipe ever! Have it for breakfast or served alongside your favorite stews, chili, soups and more.

Cornbread is a highly underrated side dish. You can whip up this deliciously sweet and moist homemade cornbread recipe with just a few pantry staples, and it makes a perfect side dish for breakfast, lunch, or dinner!

Serve it slathered with butter at breakfast, crumbled into your soup or chili at lunch, or as a side with your collard greens and pork chops for dinner. It’s inexpensive, comforting, and seriously easy to make!

Ingredients


  • 1 cup all-purpose flour
  • 1 cup yellow cornmeal
  • ¼ cup brown sugar
  • ¼ cup granulated sugar
  • 1 tsp baking powder
  • ½ tsp baking soda
  • ¼ tsp salt
  • 1 cup buttermilk
  • 2 eggs
  • ½ cup, 1 stick, unsalted butter, melted

Instructions


  1. Preheat oven to 400 degrees. Butter 5 mini loaf pans or a 9-inch square baking dish and place in the oven to warm up.
  2. In a large bowl, mix flour, cornmeal, both sugars, baking powder, baking soda and salt.
  3. Make a well in the center and add the buttermilk and eggs. Mix to combined.
  4. Pour in the melted butter and stir to incorporate into the batter until just combined (be careful not to overmix).
  5. Carefully, transfer the batter into the mini loaf pans. Bake for 15 minutes or until the cornbread starts to brown on top and a toothpick inserted in the middle comes out clean.
  6. Allow to cool for 15 minutes before serving.

If you enjoyed this easy cornbread recipe, Subscribe to our newsletter today and receive new posts and recipes directly to your inbox.
How to Easily Make the Best Iced Tea - Fun Recipes

How to Easily Make the Best Iced Tea - Fun Recipes

Want a super quick iced tea recipe that takes less than 10 minutes to make? This is it! An easy recipe that makes 2 quarts of perfect iced tea each and every time.


Tea is rich in antioxidants called flavonoids, which are most potent when tea is freshly brewed. Another benefit of brewing your own iced tea? When you make your own iced tea at home instead of using a powdered mix or buying it bottled or from a fast-food restaurant or coffee shop, you'll save money. Plus you can control the calories by limiting how much sweetener you add.

Cold brew iced tea makes the best iced tea. It’s how you should always make iced tea.

Better tasting iced tea


Cold-brewing tea is a slow and gentle steeping process that creates a sweeter and smoother tasting tea.

No more bitter iced tea


Tannins, which can make tea bitter and astringent, aren’t steeped out of the tea in cold water the way it does in hot water. No more harsh or bitterness in your iced tea anymore!

No need to boil water


Because cold brewing doesn’t involve hot water, it’s perfect to make in the hot summer months.

Not quick, but super easy


It’s the easiest way to make iced tea. But, it does take 12 hours since cold brewing takes a while.

Brewing Guide


TEA: 1.5 teaspoons loose tea
WATER: 1 cup (8 fl. oz.)
WATER TEMPERATURE: Cold water
STEEP TIME: 12 hours

A Tea Health Tip


Regardless of the variety of tea you brew, maximize the power of its flavonoids by drinking it freshly brewed. If you want to keep a batch of cold tea in your refrigerator, add a little lemon juice! The citric acid and vitamin C in that squeeze of lemon-or lime or orange-help preserve the flavonoids.
Classic Games | Indoor Activities for Kids

Classic Games | Indoor Activities for Kids

Some games are classics for a reason, they’re just simple good old  fun. These ones are our favorites, updated for modern indoor play.

Most of these indoor games for kids are fun games to play with friends indoors without many materials. The classic games don’t require any fancy equipment.

Egg & Spoon Race


Grab a spoon and any small round object that will fit on top (or if you’re brave and have easy-to-clean floors, go ahead and use a real egg!). Create a course for your child to navigate through and see if they can do it without dropping it off the spoon. Once they’ve got the hang of it, go for speed!

Potato Sack Race


Update this classic by using pillow cases! Have your kids step in and hold it up around their waist, then hop to the finish. So simple, but they will be laughing like crazy and getting crazy tired all at once.

3‑Legged Race


Tie your kids’ outside ankles together with something soft and stretchy like a long ski sock, PJ pants or bandage wrap. Now they’ll have to work as a team to coordinate their movements to get from point A to point B. This is one of our favorites because it not only builds gross motor coordination, but is great for sibling bonding too!

Wheelbarrow Puzzle Walk


Take your average Wheelbarrow race to the next level by having your child complete a puzzle in this brilliant idea from Stir The Wonder. Set-up a wooden puzzle board and scatter the pieces around a room. Grab your child’s ankles (or hips to make it a bit easier for little ones) and hold them up so they can walk on their hands to collect them. They have to bring each piece back 1‑by‑1 and fit it into the board until the puzzle is complete. (editor’s note: this is one of my kids’ favorites and is great for upper body strengthening!)

Hula Hoop


If you have a Hula Hoop, now is the perfect time to dust it off and bring it back to life. Make it fresh by turning it into a game like who can do the most circles around their waist, arm or ankle. Try rolling it back and forth between 2 people, or see if your child can put some backspin on it and make it return to themselves. For little ones, put it on the floor and practice jumping in/out, side-to-side or have them pick it up and use it as a steering wheel to drive an imaginary car all around the house!

Jumping Limbo


Do the Limbo in reverse: instead of going under, have your kids jump over! Using something flexible like a stretchy exercise band, crepe paper or jump rope, have 2 people hold it (or attach it to something on one side) and start it on the ground. Have your kids run in a circle and then jump over it. After a few successful jumps, raise it an inch or two. Keep raising it until they can’t jump any higher!

Hide-and-Seek


Make it more active by having them hide on different levels of your house every time, that way they’re going up and down stairs every few minutes. Or, have the player that is found first perform a “penalty” that can include classic exercises like jumping jacks, burpees or sit-ups!

Simon Says


Get your child on board to play a game of Simon Says and they’ll do whatever active motions you dream up. But make sure you still make them a little silly – think animal movements, dramatic actions and anything on one foot.

Twister


Get in a good stretch by playing a game of twister. Don’t have the game? Make your own by taping construction paper circles on the floor.

Bubbles


We’ve never met a child that doesn’t get excited about bubbles. Blow some with a wand and challenge your kids to pop them all before they touch the ground, prompting lots of jumping and diving. Better yet, create your own Bubble Machine with a fan! (via Kids Activities Blog)

Parachute


Grab a bed sheet and get your whole family involved – everyone taking a side and rapidly moving your arms up and down. Put some small balls or balloons on top and try and fling them off. Kids love this one!
Balloon Games | Indoor Activities for Kids

Balloon Games | Indoor Activities for Kids

Has your child ever received a balloon at a birthday party and been totally enamored by it? Take that fascination to the next level by adding in a few rules and they’ll be happily moving around developing their gross motor skills while burning off some of that rambunctious energy.

Try some of our favorite balloon games and always keep a few handy to pull out when the going gets tough.

Just a reminder that pieces of burst balloons can be a serious choking hazard, so if you have younger kids, make sure they are supervised during these activities at all times.

Don’t Let The Balloon Touch The Ground


This is the classic game that kids fall for every time. The rules are simple – hit the balloon up in the air but don’t let it touch the ground. To make it more challenging for older kids, have them juggle more than 1 balloon, or tie one hand behind their back. Time them to see how long they can do it for, or if you have multiple kids, have them count how many times they can hit it back and forth…then see if they can beat their time or score! This game is great for improving arm strength and hand-eye coordination.

Penguin Waddle


Place a balloon between your child’s knees and have them waddle across the room without dropping it. Make it more challenging for older kids by having them go around a few obstacles. If they drop it, they have to go back to the start.

For multiple kids, have them play as a team with the balloon placed between their hips. Once they get the hang of it, get out your timer to see how fast they can do it.

Balloon Taps


Hang a balloon by a string from your doorway so it is a few inches higher than your child’s arm reach. Then challenge them to try and tap it with their hand. Count how many they can do in a row without missing (this gets tiring very quickly!). Up the ante by seeing if they can jump and touch the balloon with the top of their head!

Balloon Blow


Set up a course and see if your child can blow a balloon all the way to the finish line. They’ll have to do lots of army crawls working their upper body and core strength along the way.

Backhand Balloon Balance


Challenge your kids to balance a balloon on the back of their hand, and see how long they can do it before it falls to the ground. You’d be surprised how much they will move around with this one!

Balloon Paddle Ball


Use a fly swatter, tennis/badminton racket or make your own paddle using a paper plate and over-sized popsicle stick (or use a paint stir stick or plastic spoon), then use it to play the games above.

These paddles are also fun for balancing your balloon. Have your kids try to keep their balloon on the paddle as they navigate through obstacles or run around the house. Not as easy as it sounds!

Balloon Foot Balance


For a real challenge, have your kids lie on the ground with their legs up in the air and try and balance the balloon on their feet. It’s not an easy task and requires a lot of concentration. It’s also a great core workout!

Balloon Volleyball


Make a net by tying a piece of string between 2 chairs and then have your child hit the balloon back and forth by running from one side to the other, trying to keep it off the floor. If you have 2 or more kids, have them hit it over the net as many times as they can without it falling.

Balloon Hockey


Use a small kiddy hockey stick or make your own out of cardboard to navigate a balloon into a net (use a laundry basket or box on its side if you don’t have any smaller ones to bring indoors).
Caramel Coffee Bread Pudding Recipe

Caramel Coffee Bread Pudding Recipe

This Caramel Coffee Bread Pudding is decadent and delicious made with challah bread, coffee and drizzled with a yummy caramel sauce. First things first. Let’s talk about the pudding. It’s so simple to make, and yet it tastes like it came from a fancy-schmancy coffeehouse. Ultra-custardy, moist, and absolutely reminds me of a cafe mocha.
As much as bread pudding can, there’s an entire cup of brewed coffee inside the pudding alone. Let me emphasize a  few very important points before I leave you to your bread pudding recipes.

You must devour this pudding warm. It is the bombety warm and every luscious bite totally melts in your mouth.

You simply must include literal rivers of the aforespoken caramel rum sauce. Taking it all the way.

Lastly and most importantly, you must eat all of this bread pudding in the day it is made. Preferably within minutes, because hello, anticipation! It’s really not nearly as good after one day, but I honestly don’t think you’re going to have a problem with this one.

Ingredients


  • 1 loaf challah bread
  • 1 ¼ cup heavy cream
  • ¾ cup whole milk
  • 6 oz. Folgers K-Cup Caramel Drizzle flavored coffee
  • ¾ cup granulated sugar
  • ½ cup brown sugar
  • 1 teaspoon ground cinnamon
  • 4 large eggs
  • 2 tablespoons melted butter
  • Caramel sauce for topping

Instructions


  1. Preheat oven to 350 degrees.
  2. In a large bowl, put the bread cubes. Combine heavy cream, milk and coffee, and pour over the bread. Let it sit until the bread sucks in all the mixture, about 10-15 minutes.
  3. In a separate bowl, combine granulated sugar, brown sugar, cinnamon and eggs.
  4. Coat the bottom of an 8 inch square baking pan with the melted butter making sure to cover the sides of the pan as well.
  5. Spoon the bread mixture into the pan. Pour the egg and sugar mixture over the bread.
  6. Place in the oven and bake until the bread pudding has set and edges are golden brown, about 35-40 minutes. Let cool on a wire rack. Drizzle caramel over the top.
  7. Cut the bread pudding into squares to serve. Top with vanilla ice cream, if desired.
Homemade Meatball Recipes - Easy and Fun Recipes

Homemade Meatball Recipes - Easy and Fun Recipes

This easy meatball recipe is so flavorful and delicious while being super easy to make. If you always thought homemade meatballs were too much trouble, make this easy Italian meatball recipe to see how simple it is.  The flavor can’t be beat and you can use the meatballs in lots of recipes.

Meatballs are everyones favorites. They’re so versatile in terms of serving since they could be an appetizer or part of a main dish. Meatballs are easy to transport if you need to bring them to a party. And they can be customized based on the theme of what you’re going for, whether it’s the most obvious choice of Italian, or something a little more funky style meatballs.

This meatball recipe is the easy and fun recipes, with simple ingredients.

Ingredients


  • Extra-virgin olive oil
  • 1 large onion, 1/4-inch dice
  • Salt
  • 2 cloves garlic, smashed and chopped
  • Pinch crushed red pepper
  • 1/2 pound ground beef
  • 1/2 pound ground veal
  • 1/2 pound ground pork
  • 2 large eggs
  • 1 cup grated Parmigiano
  • 1/4 cup finely chopped fresh Italian parsley leaves
  • 1 cup breadcrumbs
  • 1/2 cup water

Marinara Sauce Ingredients


  • 1/4 cup extra-virgin olive oil
  • 1/4 pound diced pancetta
  • 2 large Spanish onions, cut into 1/4-inch dice
  • Kosher salt
  • 4 large garlic cloves, smashed and chopped
  • 4 (28-ounce) cans Italian plum San Marzano tomatoes

Instructions


Coat a large saute pan with olive oil, add the onions and bring to a medium-high heat. Season the onions generously with salt and cook for about 5 to 7 minutes. The onions should be very soft and aromatic but have no color. Add the garlic and the crushed red pepper and saute for another 1 to 2 minutes. Turn off heat and allow to cool.

In a large bowl combine the meats, eggs, Parmigiano, parsley and bread crumbs. It works well to squish the mixture with your hands. Add the onion mixture and season generously with salt and squish some more. Add the water and do 1 final really good squish. The mixture should be quite wet. Test the seasoning of the mix by making a mini hamburger size patty and cooking it. The mixture should taste really good! If it doesn't it is probably missing salt. Add more. Add more anyway.

Preheat the oven to 350 degrees F.

Shape the meat into desired size. Some people like 'em big some people like 'em small. I prefer meatballs slightly larger than a golf ball. Coat a large saute pan with olive oil and bring to a medium-high heat. Brown the meatballs on all sides. Place them on a cookie sheet and bake them in the preheated oven for about 15 minutes or until the meatballs are cooked all the way through. If using right away, add them to your big pot of marinara sauce. If not using right away, they can be frozen for later use. Serve with pasta and sauce or just eat them straight out of the pot!

Marinara Sauce Instructions


Coat a large saucepot with olive oil and add the pancetta. Bring the pot to a medium-high heat and cook the pancetta for 4 to 5 minutes. Add the onions, season generously with salt and stir to coat with olive oil. Cook the onions for 6 to 7 minutes stirring frequently. The onions should become very soft and aromatic but have no color. Add the garlic and cook for another 2 to 3 minutes stirring frequently.

Pass the tomatoes through the food mill. Be sure to pass all of the pulp through the holes leaving only the stems and the seeds, and be sure to scrape the pulp off of the bottom of the food mill. That's all of the big money stuff! Add the tomatoes to the pot and rinse out 1 of the empty tomato cans with water and add that water to the pot (about 2 to 3 cups). Season generously with salt and TASTE IT!!!! Tomatoes take a lot of salt. Season in baby steps and taste every step of the way. Cook the sauce for 2 to 3 hours, stirring occasionally and tasting frequently.

Use the sauce right away on pasta or for any other tomato sauce need. This sauce can also be cooled and stored in the refrigerator for a few days and freezes really well.

Coloring

[Coloring][recentbylabel]

Culture

[Culture][recentbylabel]
Notification
This is just an example, you can fill it later with your own note.
Done